2.搭建 Next.js 应用程序
在本文中,我们将介绍
- 如何配置故事书
- 配置 TailwindCSS
- 添加 SEO 友好的 _document.js
- 创建基本组件
配置故事书
在上一篇文章中,我们在 Next.js 应用程序中安装和设置了故事书。安装过程会创建一个名为 stories 的文件夹。并且,在该文件夹下,有安装过程中附带的 JavaScript 文件。删除 stories 文件夹下的所有文件。它会在 6006 端口打破故事书。
安装以下内容:
npm install @storybook/addon-postcss
npm install storybook-css-modules-preset
进入 .storybook 文件夹,打开 main.js 文件,修改文件内容如下:
module.exports = {
  "stories": [
    "../stories/**/*.stories.mdx",
    "../stories/**/*.stories.@(js|jsx|ts|tsx)"
  ],
  "addons": [
    "@storybook/addon-links",
    "@storybook/addon-essentials",
    "@storybook/addon-postcss",
    "storybook-css-modules-preset"
  ],
  webpackFinal: async config => {
    config.module.rules.push({
      test: /\.scss$/,
      use: ['style-loader', 'css-loader', 'postcss-loader', 'sass-loader']
    });
    return config
  }
}
打开 preview.js 文件,更新内容如下:
import '../styles/globals.css'
export const parameters = {
  actions: { argTypesRegex: "^on[A-Z].*" },
  controls: {
    matchers: {
      color: /(background|color)$/i,
      date: /Date$/,
    },
  },
}
配置 TailwindCSS
在上一篇文章中,我们安装和配置 TailwindCSS。让我们快速添加一个新主题。
打开tailwind.config.js并将主题修改为
theme: {
  extend: {
    colors: {
      'light-blue': colors.lightBlue,
      cyan: colors.cyan,
    }
  },
},
现在,文件的内容看起来像,
const colors = require('tailwindcss/colors')
module.exports = {
  purge: ['./pages/**/*.{js,ts,jsx,tsx}', './components/**/*.{js,ts,jsx,tsx}'],
  darkMode: false, // or 'media' or 'class'
  theme: {
    extend: {
      colors: {
        'light-blue': colors.lightBlue,
        cyan: colors.cyan,
      }
    },
  },
  variants: {
    extend: {},
  },
  plugins: [],
}
创建 _document.js
在 pages 文件夹下,新建文件 _document.js 并添加以下内容。
import Document from "next/document";
import {Html, Head, Main, NextScript} from "next/document";
class AppDocument extends Document {
    render () {
        return (
            <Html lang="en">
                <Head>
                    <meta httpEquiv="Cache-control" content="public" />
                    <meta httpEquiv="Content-Type" content="text/html; charset=utf-8" />
                    <meta name="keywords" content="Perl, Python, Mojolicious tutorial, Javascript, Next.js" />
                </Head>
                <body>
                    <Main></Main>
                    <NextScript></NextScript>
                </body>
            </Html>
        )
    }
}
export default AppDocument
您可以根据自己的喜好修改元名称。它只是一个样本。
如果您不知道 _document.js 是什么,请点看下一篇 “2.1-_document.js-如何在-Next.js-中改进-SEO"了解更多信息。
组件
我们将创建一些组件,然后在我们的页面中使用这些组件。我们将从以下内容开始:
- 标头组件
- 导航组件
- 类别组件
- 类别列表组件
- 博客组件
- 博客列表组件
- 按钮组件
我们将创建按钮组件,但我们将在接下来的文章中使用它。
我更喜欢将应用程序分成更小的组件。因此,更容易管理和调试它。它还有另一个优点,我们将在整个应用程序中使用它而不会干扰 UI。
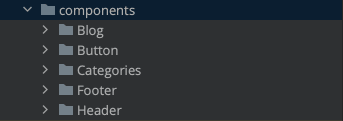
创建新的目录组件。并且,在 components 文件夹下,创建 Header、Footer、Blog、Button、Categories 文件夹。

在 Header 文件夹下,创建两个 javascript 文件:
- HeaderComponent.js
- 导航组件.js
打开 NavigationComponent.js 并添加以下内容:
function NavigationComponent() {
    return (
        <div className="bg-gradient-to-r from-cyan-400 to-light-blue-500 rounded shadow-lg">
            <nav className="flex flex-wrap items-center justify-between p-4  rounded">
                <div className="block lg:hidden">
                    <button
                        className="navbar-burger flex items-center py-2 px-3 text-indigo-500 rounded border border-indigo-500">
                        <svg className="fill-current h-3 w-3" viewBox="0 0 20 20" xmlns="http://www.w3.org/2000/svg">
                            <title>Menu</title>
                            <path d="M0 3h20v2H0V3zm0 6h20v2H0V9zm0 6h20v2H0v-2z"></path>
                        </svg>
                    </button>
                </div>
                <div className="navbar-menu hidden lg:flex lg:flex-grow lg:items-center w-full lg:w-auto">
                    <div className="lg:mx-auto">
                        <a className="block lg:inline-block mt-4 lg:mt-0 mr-10 font-bold text-white hover:underline"
                        href="/">
                            Home
                        </a>
                        <a className="block lg:inline-block mt-4 lg:mt-0 mr-10 font-bold text-white hover:underline"
                        href="/about">
                            About
                        </a>
                        <a className="block lg:inline-block mt-4 lg:mt-0 text-white font-bold hover:underline"
                        href="/contact">
                            Contact
                        </a>
                    </div>
                </div>
            </nav>
        </div>
    )
}
export default NavigationComponent
现在,打开HeaderComponent.js文件并使用其中的 NagivationComponent。
import NavigationComponent from "./NavigationComponent";
function HeaderComponent() {
    return (
        <div>
            <NavigationComponent />
        </div>
    )
}
export default HeaderComponent;
这就是您的 HeaderComponent 的全部内容。
并验证您的标头组件是否工作正常。在故事文件夹中创建一个故事。
创建一个新文件 Header.stories.js 并添加以下内容:
import HeaderComponent from "../components/Header/HeaderComponent";
export default {
    title: 'App/AppHeader',
    component: HeaderComponent
}
const Template = args => <HeaderComponent />
// New instance of component
 export const Default = Template.bind({})
我们没有为这个故事传递任何论据,因为目前没有必要。也许我们会在即将发表的文章中添加。
现在,运行
yarn storybook
在故事书 URL 中,您将在 App 文件夹下看到 AppHeader。当您单击 AppHeader 时,它看起来像下面的屏幕截图。

类别 组件
在 components 文件夹下创建文件夹类别。
我们将创建两个组件,主组件总是返回类别列表(CategoriesItem.js 文件)。我们还将创建另一个使用 categories-item 组件的组件。让我们快点做吧。
创建文件CategoriesItem.js并添加以下代码:
import Link from "next/link";
function CategoriesItem() {
    const Categories = ['Perl', 'Python', 'Data Analysis', 'Mojolicious', 'NextJs']
    return (
        <div className="h-full-screen shadow-lg rounded">
            <ul className="ml-4 mb-4 max-w-full mr-4">
                <li>/#> ls</li>
                {
                    Categories.map(event =>
                        <div key={event}>
                            <li className="mt-2 mb-2 mr-4 py-4 px-4" id={event} >
                                - <a className="hover:underline hover:text-cyan-600" href="#"> {event} </a>
                            </li>
                            <hr />
                        </div>
                    )
                }
            </ul>
        </div>
    )
}
export default CategoriesItem
现在我们将创建CategoriesComponent.js并添加以下代码:
import CategoriesItem from "./CategoriesItem";
function CategoriesComponent() {
    return (
        <div className="ml-10 mt-4">
            <CategoriesItem />
        </div>
    )
}
现在,它完成了我们的类别组件。让我们更新它的故事。
在故事下,创建一个文件Categories.stories.js。添加以下代码:
import CategoriesComponent from "../components/Categories/CategoriesComponent";
export default {
    title: 'App/Categories',
    component: CategoriesComponent
}
const Template = args => <CategoriesComponent />
// New instance of component
 export const Default = Template.bind({})
如果故事书已经在运行,那么您会在 APP 下看到类别。
按钮组件
我们不会在本文中使用 Button 组件。但是,我们在接下来的部分/文章中需要它。
现在让我们创建一个主按钮。
在 components 目录下创建一个文件夹 Button。
并添加文件Button.js。使用以下内容更新文件:
const Button = ({size, children}) => {
    return(
        <button className={` bg-gradient-to-r from-cyan-400 to-light-blue-500 font-bold text-white px-6 py-2 rounded hover:bg-green-500 ${size} `}>
            {children}
        </button>
    )
}
export default Button;
现在更新故事。
在故事下创建一个文件Button.stories.js。并添加以下代码:
import Button from "../components/Button/Button";

export default {
    title: 'UI/Control/Buttons'
}

const Template = args => <Button {...args} />

export const Primary = Template.bind({})

Primary.args ={
    size: "h-10 w-56",
    children: "Primary Button"
}
打开故事书,您将在 UI/Control/Buttons 下看到按钮。
博客组件
到目前为止,我们已经为我们的应用程序创建了一个基本的导航标题、类别。是时候添加 Blog 组件的布局了。
在 components 文件夹下创建一个文件夹 Blog。添加 BlogComponent.js 和 BlogList.js 文件。
在BlogList.js文件中添加虚拟内容并使用以下内容更新文件:
function BlogList() {
    return (
        <div className="ml-4">
            <div className="border-b shadow rounded-md hover:shadow-lg hover:border">
                <div className="ml-4 mt-4">
                    <h1 className="font-bold text-2xl">It's All About (The) Next.js api routes</h1>
                </div>
                {/*Posted Date*/}
                <div className="ml-4 mt-4 flex">
                    <p>
                        <span className="text-gray-400">Posted On </span>
                        <small className="hover:underline hover:text-cyan-500">May 22, 2021</small>
                    </p>
                    {/*Categories Belongs to*/}
                    <div className="ml-10">
                        <span className="inline-block bg-cyan-200 text-cyan-800 text-xs px-2 rounded-full uppercase font-semibold tracking-wide mr-2">
                            Perl
                        </span>
                        <span className="inline-block bg-cyan-200 text-cyan-800 text-xs px-2 rounded-full uppercase font-semibold tracking-wide mb-10">
                            Nextjs
                        </span>
                    </div>
                </div>
            </div>
            <div className="border-b shadow rounded-md hover:shadow-lg hover:border">
                <div className="ml-4 mt-4">
                    <h1 className="font-bold text-2xl">Develop a blog in Next.js and Mojolicious - (Part - 1)</h1>
                </div>
                {/*Posted Date*/}
                <div className="ml-4 mt-4 flex">
                    <p>
                        <span className="text-gray-400">Posted On </span>
                        <small className="hover:underline hover:text-cyan-500">May 22, 2021</small>
                    </p>
                    {/*Categories Belongs to*/}
                    <div className="ml-10">
                        <span className="inline-block bg-cyan-200 text-cyan-800 text-xs px-2 rounded-full uppercase font-semibold tracking-wide mr-2">
                            Perl
                        </span>
                        <span className="inline-block bg-cyan-200 text-cyan-800 text-xs px-2 rounded-full uppercase font-semibold tracking-wide mb-10">
                            Nextjs
                        </span>
                    </div>
                </div>
            </div>
            <div className="border-b shadow rounded-md hover:shadow-lg hover:border">
                <div className="ml-4 mt-4">
                    <h1 className="font-bold text-2xl">It's All About (The) Next.js Api routes (Part-2)</h1>
                </div>
                {/*Posted Date*/}
                <div className="ml-4 mt-4 flex">
                    <p>
                        <span className="text-gray-400">Posted On </span>
                        <small className="hover:underline hover:text-cyan-500">May 22, 2021</small>
                    </p>
                    {/*Categories Belongs to*/}
                    <div className="ml-10">
                        <span className="inline-block bg-cyan-200 text-cyan-800 text-xs px-2 rounded-full uppercase font-semibold tracking-wide mr-2">
                            Perl
                        </span>
                        <span className="inline-block bg-cyan-200 text-cyan-800 text-xs px-2 rounded-full uppercase font-semibold tracking-wide mb-10">
                            Nextjs
                        </span>
                    </div>
                </div>
            </div>
        </div>
    )
}

export default BlogList
在BlogComponent.js文件中,使用 BlogList.js 组件。
import BlogList from "./BlogList";
function BlogComponent() {
    return (
        <div className="ml-4 mt-4 w-1/2 container mr-4">
            <BlogList />
        </div>
    )
}
export default BlogComponent
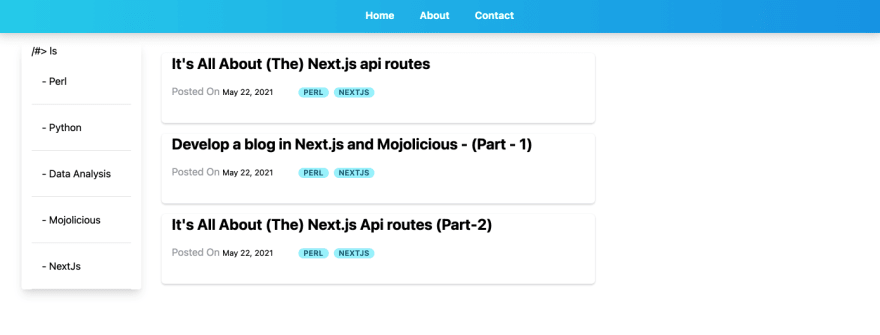
更新 index.js
在最后一节中,我们需要在主页上使用这些组件。打开 pages 文件夹下的 index.js 并将内容替换为:
import Head from 'next/head'
import CategoriesComponent from "../components/Categories/CategoriesComponent";
import BlogComponent from "../components/Blog/BlogComponent";
export default function Home() {
  return (
    <div>
      <Head>
        <title>Ashutosh.dev - A place to learn Programming</title>
        <meta name="description" content="Generated by create next app" />
        <link rel="icon" href="/favicon.ico" />
      </Head>
      <div className="flex flex-auto">
          <CategoriesComponent />
          <BlogComponent />
          <div></div>
      </div>
    </div>
  )
}
执行以下操作:
yarn dev

到目前为止,锚链接不起作用,因为我们只创建了应用程序的基本布局。随着本系列的进展,我们将继续添加组件。
- 原文作者:知识铺
- 原文链接:https://index.zshipu.com/geek/post/nextjs/storybooktailwindnextjs/2.%E6%90%AD%E5%BB%BA-Next.js-%E5%BA%94%E7%94%A8%E7%A8%8B%E5%BA%8F/
- 版权声明:本作品采用知识共享署名-非商业性使用-禁止演绎 4.0 国际许可协议进行许可,非商业转载请注明出处(作者,原文链接),商业转载请联系作者获得授权。
- 免责声明:本页面内容均来源于站内编辑发布,部分信息来源互联网,并不意味着本站赞同其观点或者证实其内容的真实性,如涉及版权等问题,请立即联系客服进行更改或删除,保证您的合法权益。转载请注明来源,欢迎对文章中的引用来源进行考证,欢迎指出任何有错误或不够清晰的表达。也可以邮件至 sblig@126.com


