Go的干净模板,领域驱动设计,清洁架构,Gin和GORM
GitHub Repo: https://github.com/resotto/goilerplate
Goilerplate
Go的干净样板,领域驱动设计,清洁架构,Gin和GORM。
什么是Goilerplate?
- 使用清洁架构的好例子。
- Go,Domain-Driven Design,Clean Architecture,Gin和GORM的火箭入门指南。
谁是Goilerplate的主要用户?
- 各种地鼠(新手到专业人士)。
为什么选择Goilerplate?
- Go中易于应用的样板。
注意
- 默认的应用程序/测试代码是微不足道的,因为您将编写很酷的逻辑。
- bitbank的公共API,即位于东京的比特币交易所,默认情况下用于某些端点。
开始
go get -u github.com/resotto/goilerplate        # might take few minutes
cd ${GOPATH}/src/github.com/resotto/goilerplate
go run cmd/app/main.go                          # from root directory
open http://0.0.0.0:8080
Goilerplate via SSH
go get
默认情况下,通过 HTTPS 获取 GitHub 存储库。所以你可能会失败:go get
~  > go get -u github.com/resotto/goilerplate

# cd .; git clone -- https://github.com/resotto/goilerplate /Users/resotto/go/src/github.com/resotto/goilerplate

Cloning into '/Users/resotto/go/src/github.com/resotto/goilerplate'...
fatal: could not read Username for 'https://github.com': terminal prompts disabled
package github.com/resotto/goilerplate: exit status 128
如果您通过 SSH 运行 GitHub 存储库,请运行以下命令:go get
git config –global url.git@github.com:.insteadOf https://github.com/
然后,请再次尝试入门。
入口
-
使用模板
GET /- 注意:以下路径来自CURRENT目录,因此请从根目录运行Gin。
r.LoadHTMLGlob(“internal/app/adapter/view/*”)
-
使用位库的公共 API
GET /tickerGET /candlestick- 注意:由于其API限制,这适用于0AM ~ 3PM(UTC)。
-
使用PostgreSQL
- 注意:请先运行此步骤的 postgres 容器。
GET /parameterGET /order
包结构
├── LICENSE
├── README.md
├── build                                     # Packaging and Continuous Integration
│   ├── Dockerfile
│   └── init.sql
├── cmd                                       # Main Application
│   └── app
│       └── main.go
├── internal                                  # Private Codes
│   └── app
│       ├── adapter
│       │   ├── controller.go                 # Controller
│       │   ├── postgresql                    # Database
│       │   │   ├── conn.go
│       │   │   └── model                     # Database Model
│       │   │       ├── card.go
│       │   │       ├── cardBrand.go
│       │   │       ├── order.go
│       │   │       ├── parameter.go
│       │   │       ├── payment.go
│       │   │       └── person.go
│       │   ├── repository                    # Repository Implementation
│       │   │   ├── order.go
│       │   │   └── parameter.go
│       │   ├── service                       # Application Service Implementation
│       │   │   └── bitbank.go
│       │   └── view                          # Templates
│       │       └── index.tmpl
│       ├── application
│       │   ├── service                       # Application Service Interface
│       │   │   └── exchange.go
│       │   └── usecase                       # Usecase
│       │       ├── addNewCardAndEatCheese.go
│       │       ├── ohlc.go
│       │       ├── parameter.go
│       │       ├── ticker.go
│       │       └── ticker_test.go
│       └── domain
│           ├── factory                       # Factory
│           │   └── order.go
│           ├── order.go                      # Entity
│           ├── parameter.go
│           ├── parameter_test.go
│           ├── person.go
│           ├── repository                    # Repository Interface
│           │   ├── order.go
│           │   └── parameter.go
│           └── valueobject                   # ValueObject
│               ├── candlestick.go
│               ├── card.go
│               ├── cardbrand.go
│               ├── pair.go
│               ├── payment.go
│               ├── ticker.go
│               └── timeunit.go
└── testdata                                  # Test Data
    └── exchange_mock.go
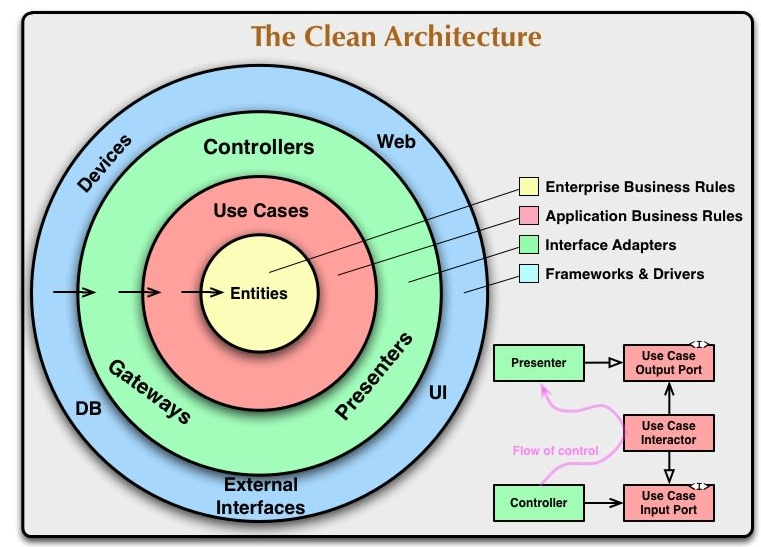
领域层
- 清洁架构的核心。它说"实体"。
应用层
- 来自核心的第二层。它说"用例"。
适配器层
- 第三层来自核心。它说"控制器/网关/演示者"。
外层
- 第四层从核心。它说"设备/ DB / 外部接口/ UI / Web"。
-
我们在这个层中不写太多代码。
-
如何跨越这些图层的边界
在 Clean Architecture 中,有依赖关系规则:
此规则表示源代码依赖项只能指向内部。在一个内圈里,没有任何东西可以知道关于外圈里某件事的任何事情。
换句话说,依赖注入需要遵循此规则。
因此,请遵循以下四个步骤:
- 定义接口
- 以参数为接口并调用其函数
- 实施它
- 注入依赖关系
在这里,我选取存储库的示例。
存储 库
.
└── internal
    └── app
        ├── adapter
        │   ├── controller.go    # 4\. Dependency Injection
        │   └── repository
        │       └── parameter.go # 3\. Implementation
        ├── application
        │   └── usecase
        │       └── parameter.go # 2\. Interface Function Call
        └── domain
            ├── parameter.go
            └── repository
                └── parameter.go # 1\. Interface
- 域层接口:
package repository

import "github.com/resotto/goilerplate/internal/app/domain"

// IParameter is interface of parameter repository
type IParameter interface {
    Get() domain.Parameter
}
- 应用程序层用例:
package usecase

// NOTICE: This usecase DON'T depend on Adapter layer
import (
    "github.com/resotto/goilerplate/internal/app/domain"
    "github.com/resotto/goilerplate/internal/app/domain/repository"
)

// Parameter is the usecase of getting parameter
func Parameter(r repository.IParameter) domain.Parameter {
    return r.Get()
}
- 适配器层的实现:
package repository
// Parameter is the repository of domain.Parameter
type Parameter struct{}
// Get gets parameter
func (r Parameter) Get() domain.Parameter {
db := postgresql.Connection()
var param model.Parameter
result := db.First(¶m, 1)
if result.Error != nil {
panic(result.Error)
}
return domain.Parameter{
Funds: param.Funds,
Btc: param.Btc,
}
}
- 适配器层控制器处的依赖关系注入:
package adapter

// NOTICE: Controller depends on INNER CIRCLE so it points inward (The Dependency Rule)
import (
    "github.com/gin-gonic/gin"
    "github.com/resotto/goilerplate/internal/app/adapter/repository"
    "github.com/resotto/goilerplate/internal/app/application/usecase"
)

var (
    parameterRepository = repository.Parameter{}
)

func (ctrl Controller) parameter(c *gin.Context) {
    parameter := usecase.Parameter(parameterRepository) // Dependency Injection
    c.JSON(200, parameter)
}
应用程序服务的实现也是相同的。
依赖注入
在 Goilerplate 中,依赖项是手动注入的。
- 注意:如果Go中的其他DI工具没有成为某种应用程序框架,它也是可以接受的。
有两种传递依赖项的方法:
- 使用位置参数
- 使用关键字参数
使用位置参数
首先,使用接口类型的参数定义用例。
package usecase

func Parameter(r repository.IParameter) domain.Parameter { // Take Argument as Interface
    return r.Get()
}
其次,初始化实现并将其提供给用例。
package adapter

var (
    parameterRepository = repository.Parameter{}        // Initialize Implementation
)

func (ctrl Controller) parameter(c *gin.Context) {
    parameter := usecase.Parameter(parameterRepository) // Inject Implementation to Usecase
    c.JSON(200, parameter)
}
使用关键字参数
首先,定义参数结构和用例。
package usecase

// OhlcArgs are arguments of Ohlc usecase
type OhlcArgs struct {
    E service.IExchange                       // Interface
    P valueobject.Pair
    T valueobject.Timeunit
}

func Ohlc(a OhlcArgs) []valueobject.CandleStick { // Take Argument as OhlcArgs
    return a.E.Ohlc(a.P, a.T)
}
然后,使用关键字参数初始化结构并将其提供给用例。
package adapter

var (
    bitbank             = service.Bitbank{}      // Implementation
)

func (ctrl Controller) candlestick(c *gin.Context) {
    args := usecase.OhlcArgs{                    // Initialize Struct with Keyword Arguments
        E: bitbank,                          // Passing the implementation
        P: valueobject.BtcJpy,
        T: valueobject.OneMin,
    }
    candlestick := usecase.Ohlc(args)            // Give Arguments to Usecase
    c.JSON(200, candlestick)
}
全局喷油器变量
在手动DI中,实现初始化成本将很昂贵。
因此,让我们使用全局注入器变量,以便仅初始化它们一次。
package adapter

var (
    bitbank             = service.Bitbank{}      // Injecter Variable
    parameterRepository = repository.Parameter{}
    orderRepository     = repository.Order{}
)

func (ctrl Controller) ticker(c *gin.Context) {
    pair := valueobject.BtcJpy
    ticker := usecase.Ticker(bitbank, pair)      // DI by passing bitbank
    c.JSON(200, ticker)
}
如何从Goilerplate开始
使用Goilerplate,您可以顺利地开始您的项目。
为了便于解释,让我们使用 Goilerplate 创建以下规范的 CRUD 的简单"CR"部分。
规格:
- 有三个实体,如"客户"、“产品和订单”。
- 订单聚合客户和产品(订单是聚合根)。
- 只有一个用例用于创建订单。
通知:
- 为方便起见,此处显示了最小代码。
- 为方便起见,此说明中没有测试代码。
首先,请准备.go文件,并遵循以下软件包布局。
包装布局
└── internal
    └── app
        ├── adapter
        │   ├── controller.go                 # Controller
        │   └── repository                    # Repository Implementation
        │       ├── customer.go
        │       ├── product.go
        │       └── order.go
        ├── application
        │   └── usecase                       # Usecase
        │       └── createOrder.go
        └── domain
            ├── customer.go                   # Entity
            ├── product.go                    # Entity
            ├── order.go                      # Entity
            └── repository                    # Repository Interface
                ├── customer.go
                ├── product.go
                └── order.go
定义实体
其次,让我们创建实体、客户、产品和订单。
|
|
定义存储库接口
定义实体后,让我们在包中准备它们的存储库。domain
|
|
定义用例
然后,让我们准备创建顺序的用例。
|
|
定义存储库实现
准备用例后,让我们在包中实现存储库接口。adapter
但是,为方便起见,此处省略了这一部分。
// order.go
package repository

import (
    "domain" // simplified for convenience
)

type Order struct{}

func (o Order) Save(order domain.Order) {
    // omitted here for convenience
}
定义控制器
最后,让我们定义控制器来调用创建订单的用例。
|
|
就是这样!
测试
|
|
有两条规则:
- 包含测试代码的包的名称为 。
xxx_test - 在包装上放置模拟。
testdata
测试包结构
|
|
实体
请在实体所在的同一目录中编写测试。
|
|
用例
请在包上准备模拟(如果需要),并在与用例相同的目录中编写测试。testdata
|
|
命名约定
接口
- 添加前缀,如 。
I``````IExchange- 注意:如果您可以区分接口和实现,则任何命名约定都是可以接受的。
模拟
- 添加前缀,如 。
M``````MExchange- 注意:如果您可以区分模拟和生产,则任何命名约定都是可以接受的。
文件
- 文件名可以重复。
- 对于测试,请添加后缀,如 .
_test``````parameter_test.go - 对于模拟,请添加后缀,如 .
_mock``````exchange_mock.go
包
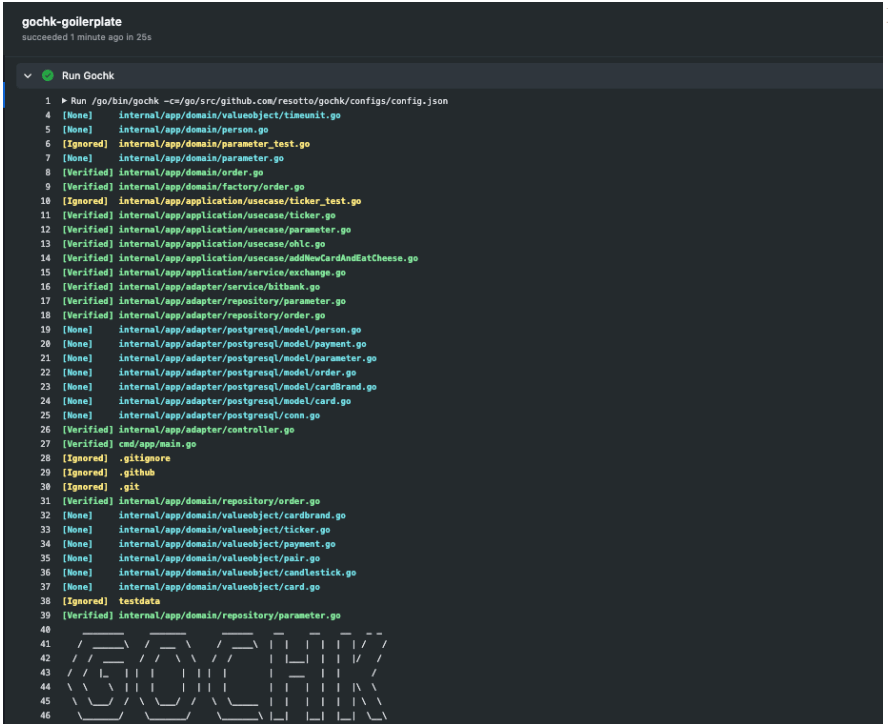
与GOCHK
Gochk,用于go文件的静态依赖关系分析工具,赋予Goilerplate如此多的功能!
让我们将 Gochk 合并到 CI 流程中。
|
|
然后,它的结果是:
使用PostgreSQL
首先,从 GitHub 容器注册表拉取 docker 映像,并使用以下命令运行容器:ghcr.io/resotto/goilerplate-pg
docker run -d -it –name pg -p 5432:5432 -e POSTGRES_PASSWORD=postgres ghcr.io/resotto/goilerplate-pg:latest
然后,让我们来看看:
open http://0.0.0.0:8080/parameter
open http://0.0.0.0:8080/order
建筑形象
如果从 GitHub 容器注册表拉取映像失败,还可以从 Dockerfile 生成 Docker 映像。
cd build
docker build -t goilerplate-pg:latest .
docker run -d -it –name pg -p 5432:5432 -e POSTGRES_PASSWORD=postgres goilerplate-pg:latest
Docker 映像
从 GitHub 容器注册表中提取的映像是从简单的 Dockerfile 和 init.sql构建的。
|
|
|
|
- 原文作者:知识铺
- 原文链接:https://index.zshipu.com/geek/post/go/Go%E7%9A%84%E5%B9%B2%E5%87%80%E6%A0%B7%E6%9D%BF%E9%A2%86%E5%9F%9F%E9%A9%B1%E5%8A%A8%E8%AE%BE%E8%AE%A1%E6%B8%85%E6%B4%81%E6%9E%B6%E6%9E%84Gin%E5%92%8CGORM/
- 版权声明:本作品采用知识共享署名-非商业性使用-禁止演绎 4.0 国际许可协议进行许可,非商业转载请注明出处(作者,原文链接),商业转载请联系作者获得授权。
- 免责声明:本页面内容均来源于站内编辑发布,部分信息来源互联网,并不意味着本站赞同其观点或者证实其内容的真实性,如涉及版权等问题,请立即联系客服进行更改或删除,保证您的合法权益。转载请注明来源,欢迎对文章中的引用来源进行考证,欢迎指出任何有错误或不够清晰的表达。也可以邮件至 sblig@126.com